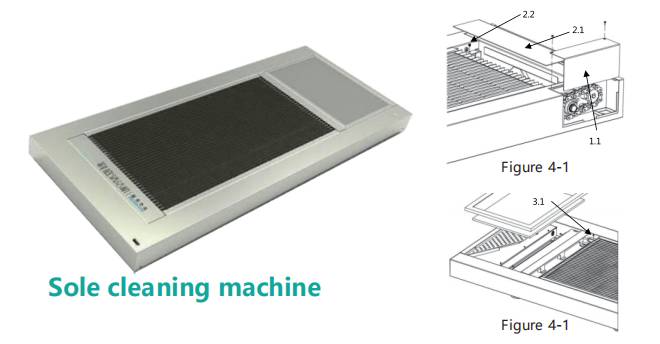
Product introduction:
The sole cleaning machine adopts the advanced brush structure technology and unique water circulation cleaning technology, which can quickly and effectively remove the sole dust particles by walking on it, featuring quick and efficient cleaning, energy saving and environmental protection. It can be used for a long time after putting into operation, thus effectively reducing production costs. The product can be installed at all kinds of entrances to completely isolate the sole contaminants outside, reliably and effectively ensuring the quality of the sanitary environment of enterprises.
This sole cleaning machine mainly provides sole contamination solutions for automobile, electronics, food, medical devices and other manufacturing enterprises. It can be customized and combined with other equipment according to different use environments to meet the use needs to a greater extent. With intelligent operations and fully automatic sensing switch, the product can realize unattended operations, thus effectively saving energy and reducing management costs.
Equipment safety and accident prevention:
● The equipment is produced in accordance with cutting-edge technical standards and recognized safety regulations. However, the use of this equipment may still pose a danger to persons or cause damage to this equipment and other items.
● The equipment must be used in sound technical condition and in accordance with the operating instructions for its intended purpose only, and operated with care and caution.
● The equipment is only suitable for cleaning the soles of flat shoes. Any other use or misuse is a violation of its intended purpose. The manufacturer/supplier will not be held responsible for damage caused by improper use, which should be borne by the user himself/herself.
● Compliance with operating instructions, including compliance with maintenance recommendations/regulations given by the manufacturer, is also an integral part of regulated use.
Equipment technical parameters:

Preparation before equipment operation:
● Confirm whether the equipment is powered on;
● Confirm whether the water level is maintained at the MAX scale and that the water is clean enough;
● Confirm whether the absorbent sponge is kept in a semi-dry state;
● Confirm whether the equipment can work properly
Equipment installation and debugging:
Connecting power supply: AC 220V/50Hz.
1.Confirm that the equipment and the water drain/replenishing device are energized: Turn on the power (grounding wire connected) and ensure that the leakage protection plug switch has been turned on; ensure that the water drain/replenishing device is energized normally and the indicator light is on;
2. Fill water: Open the foot pedal, fill cleaning water, and keep the water level at the MAX scale;
3. The equipment startup mode has been set to auto-sensing before leaving the factory.
Equipment installation and debugging:
Drive chain maintenance (Figure 3-1)
① Open the drive chain access panel (1.1);
② Fill the appropriate amount of grease on the chain.
2. Drive shaft bearing maintenance (Figure 3-1):
① Open the drive shaft cover (2.1);
② Take out the sealing screw (2.2) at the oil port, fill the appropriate amount of grease, and restore the sealing screw and the drive shaft cover.
3. Driven shaft bearing maintenance (Figure 3-2):
① Open the foot pedal;
② Remove the driven shaft cover;
③ Remove the sealing screw (3.1) at the oiling port, fill the appropriate amount of grease (molybdenum disulfide extreme pressure lithium grease is recommended), and then restore the sealing screw and the driven shaft cover.
Note: The maintenance cycle is once every three months, and the grease is recommended to use molybdenum disulfide extreme pressure lithium grease. Warning! All maintenance of the equipment must be carried out with the power off
II. Safety tips
· Please perform only the operations described in these operating instructions.
· The equipment is suitable for 220V AC power supply. It must be connected to a power outlet and grounded.
· The equipment cannot work in explosive gas environments.
· The equipment cannot work near high voltage power lines.
· The equipment and its components will heat up during operation. Do not touch them while running and wait for cooling before replacing consumables or disassembling.
· There are some hazard warning stickers on the equipment. Do not remove the warning stickers, or hazards may not be easily identified
· Other operations shall be performed by trained specialists and customer service technicians.
· To ensure safety, the elderly need to be accompanied by others to use this equipment carefully, and children are prohibited from using the equipment.
· No one is allowed to play, sit or lie on the equipment.
· Avoid dropping items into the sole cleaning machine that could cause damage to the equipment or clogging of the filter and pump.
· Please stand while using, and pay attention to keep clothing, hair, accessories and other personal items away from exposed rotating parts.
· Any exposed body part shall not touch the sole cleaning machine when it is working.
Equipment operation and commissioning:
· Open the pedal to confirm whether the water level is maintained at the MAX scale;
· Check if the sensor indicator is on after the equipment is powered on;
· Block the sensor once to confirm whether the equipment can work properly and the brush can run properly;
· Stop blocking the sensor to confirm whether the equipment can stop automatically after about 15s;
· Press the drain button to see if it drains properly.
Demonstration:
1. Pass through the cleaning area and suction drying area successively in the direction indicated in Figure 2-1. The sole can be cleaned effectively by staying in the suction drying area for 2 seconds. The longer you stay in the suction drying area, the better the cleaning effect.

2. Clean the absorbent pad
The absorbent sponge should be cleaned once a day and the cleaning frequency can be adjusted according to the actual situation, to ensure the cleanliness of the absorbent sponge and water absorption effect. After cleaning, squeeze the absorbent sponge (the water absorption effect is the best in semi-dry state) to avoid damage to the absorbent sponge. If the equipment will not be used for a long time, please seal the absorbent sponge with plastic film for storage.
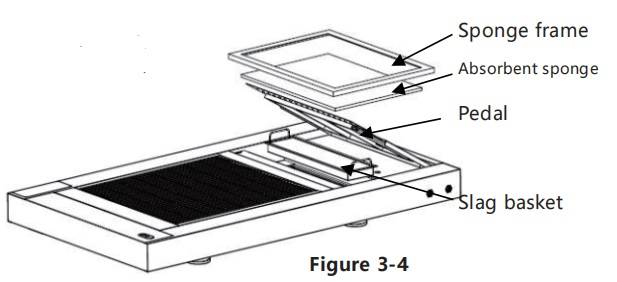
3. Clean the sink (Figure 3-4)
① Remove the sponge frame, open the foot pedal, and support the foot pedal with a support bar;
② Take out the slag basket and rinse it with water in the sink.
③ Press the drain switch button for drainage (it is recommended to stir the water in the sink while draining to clean the dirt more thoroughly);
④ After confirming that the water is drained, place the slag basket back, cover the foot pedal, and lay the absorbent sponge and sponge frame;
⑤ Fill cleaning water and keep the water level at MAX scale. The equipment can be used normally after the water injection is completed.
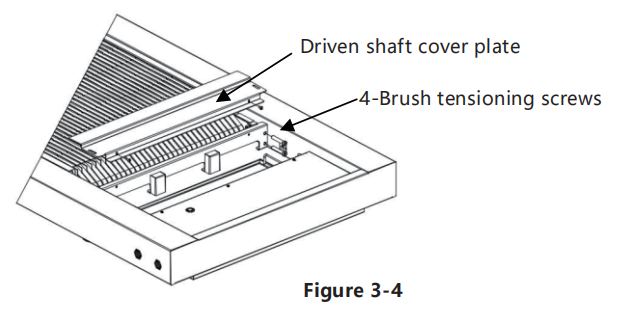
4. Adjust the brush (Figure 4-1)
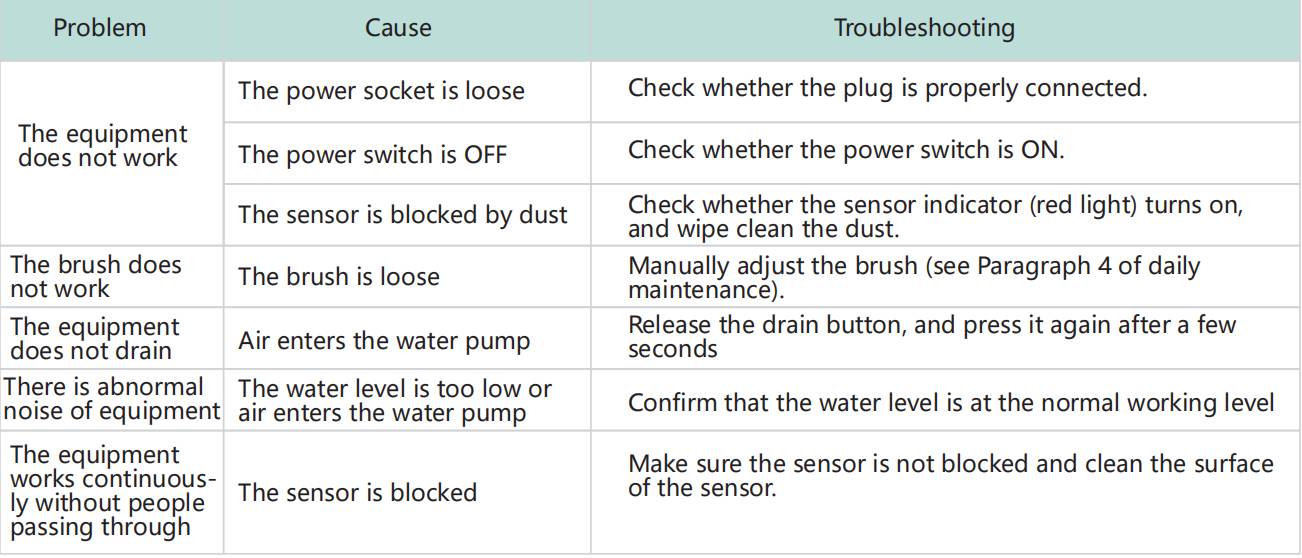
When the brush does not work during normal equipment operation, it is necessary to manually tighten the brush tensioning screws.
① Disconnect the equipment power supply, open the foot pedal, and support the foot pedal with a support bar;
② Remove the driven shaft cover plate, find the brush tensioning screws and tighten them with the appropriate force in a clockwise direction;
③ Note that a total of 4 tensioning screws on both sides need to be adjusted consistently to ensure that the equipment can work normally and stably after adjustment;
④ Turn on the power and check whether the brush is working normally; if the brush is still not working, please follow the above steps to adjust the brush tensioning screws until working normally
List of accessories:
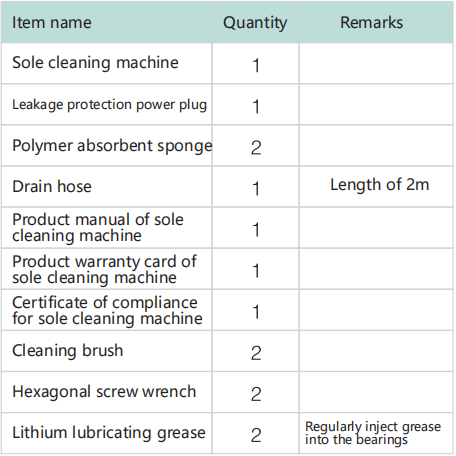
List of accessories:
Consultation